Page Contents
Gooseneck Microphones
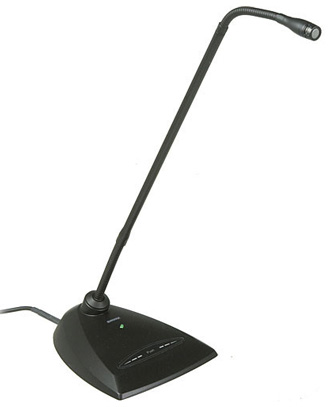
Gooseneck microphones are installed in every General Purpose Classroom with a capacity of 60+. To turn on the gooseneck microphone press the button in the center of the base labeled PUSH, press the button again to turn it off. A light on the base will turn on to signal when the microphone is on.
Wireless Microphones
Wireless microphone receivers are installed in every General Purpose Classroom with a capacity of 60+. There is a second wireless microphone receiver installed in every room with a capacity of 90+, this allows you to have 2 people using wireless microphones at the same time. To use these you must purchase a wireless microphone.
Purchasing
The wireless microphone itself pairs with a wireless microphone receiver and needs to be purchased by the user. If an individual or department wants to use a wireless microphone they must purchase one of the following kits:
- Lapel microphone with bodypack
- Headset microphone with bodypack
- In-ear microphone with bodypack
- Handheld microphone (no bodypack needed)
These microphones are available for purchase from a number of different vendors, including UMD Stores when they have them in stock. Be careful that the correct microphone gets ordered when purchasing from anywhere other than the previous links, there are many variations of these microphones and only the ones above will work with our classrooms.
Setting the Frequency
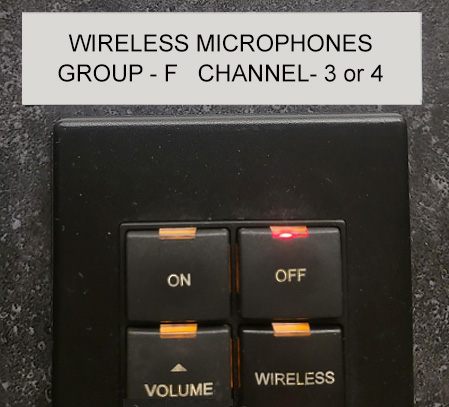
The microphone itself must be set to the correct frequency for each room, each room has a different frequency and will need to be set for that specific room. The microphone will stay on the frequency it is set at until it gets changed. Frequencies will be noted on a sticker on the podium, as in the following example in one classroom:
Some rooms may have the capability for multiple microphones, you can set your microphone to either frequency and it will work. However, if you use 2 microphones at the same time they will need to be set on different frequencies. To set the frequency:
- Open the battery compartment of your microphone.
- Turn on the microphone.
- Use the 'Group' and 'Channel' button to select the correct frequency for the room.
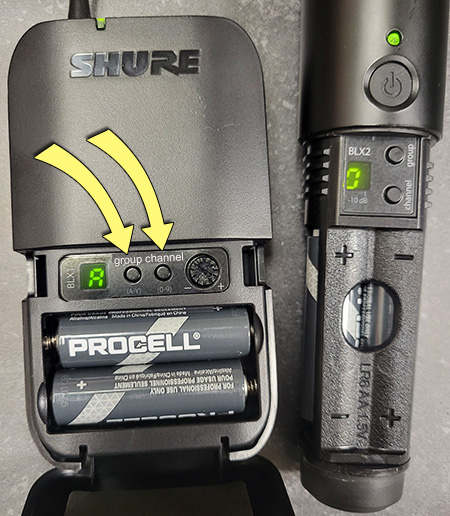
You may also need to adjust the volume, you can do this by using the dial underneath the battery cover. We recommend turning the volume all the way up and only turn it down if you find you are too loud in the room.
Have Questions or Need Help?
For questions, concerns, and help visit Classroom Technology.