Page Contents
What is Wireless Presentation?
Wireless presentation uses the Airtame app to connect to the projector in any General Purpose Classroom without plugging in a cable to your computer.
Using Airtame
- Connect to eduroam wifi on your device.
- Install the Airtame app on your University computer from Self Service (Mac) or Software Center (PC), or on your personal computer at airtame.com/start.
- When you are in the General Purpose classroom you wish to present in:
- Power on your Display by selecting "On" on the podium keypad.
- Select the correct source by pressing either the "Source" or "Wireless" button on the podium keypad.
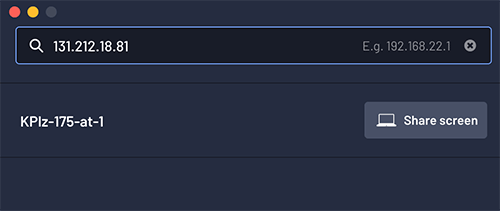
- Type the IP address into the Airtame app on your device. The IP address can be found on the classroom display as shown in the following illustration.
Example: 12.34.56.78 including periods.

- The Airtame device for that room should display in your Airtame app. Select "Share screen".

- A PIN (Personal Identification Number) will display on the classroom screen. Enter it into your Airtame app.
- Select if you would like to display your entire screen (including all notifications and anything else that shows on your screen), or just a certain window.
- Remember to select the button to unmute the Airtame sound if you would like the sound to be shared via the room speakers.

We recommend setting up and testing the Airtame app on your device prior to your class period. Please note that you must use the Airtame app; other streaming apps are not supported at this time. If you have any difficulty installing the Airtame app or setting it up, please contact the ITSS Help Desk ([email protected] or (218) 726-8847 ) for assistance.
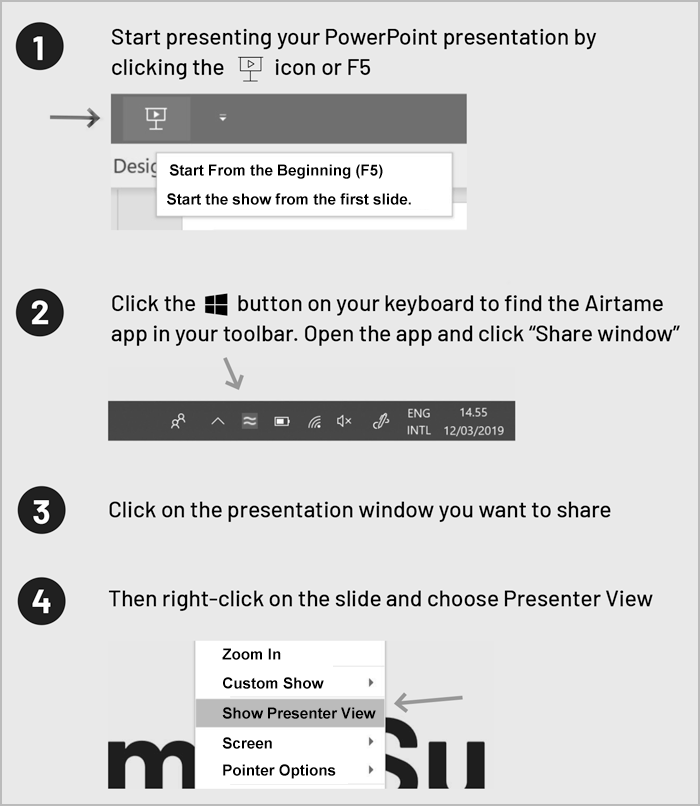
Using Presenter Mode in PowerPoint: Windows
Instructions are provided in following poster image:

Text description of the previous poster image:
- Start presenting your PowerPoint presentation by clicking the Present icon or F5.
- Click the windows button on your keyboard to find the Airtame. app in your toolbar. Open the app and click "Share window".
- Click on the presentation window you want to share.
- Then right-click on the slide and choose Presenter View.
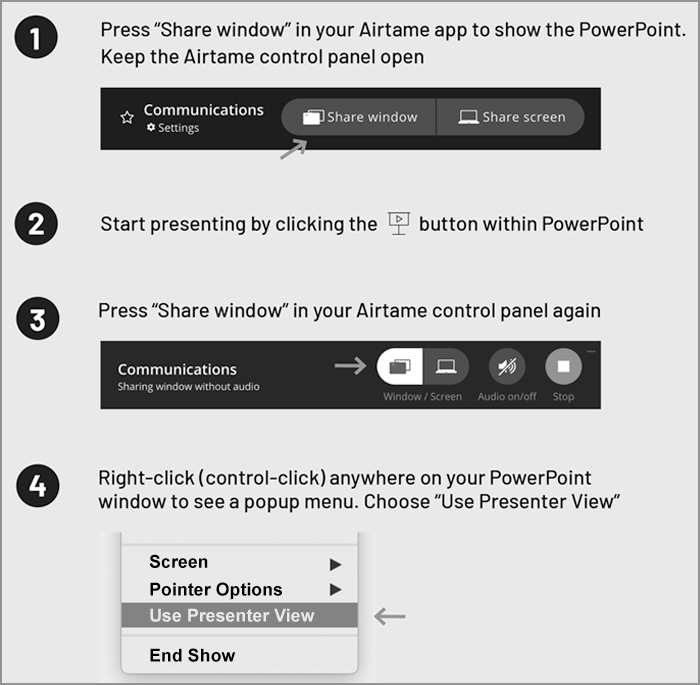
Using Presenter Mode in PowerPoint: Mac
Instructions are provided in following poster image:

Text description of the previous poster image:
- Press "Share window" in your Airtame app to show the PowerPoint. Keep the Airtame control panel open.
- Start presenting by clicking the Present button within PowerPoint.
- Press "Share window" in your Airtame control panel again.
- Right-click (control-click) anywhere on your PowerPoint window to see a popup menu. Choose "Use Presenter View".
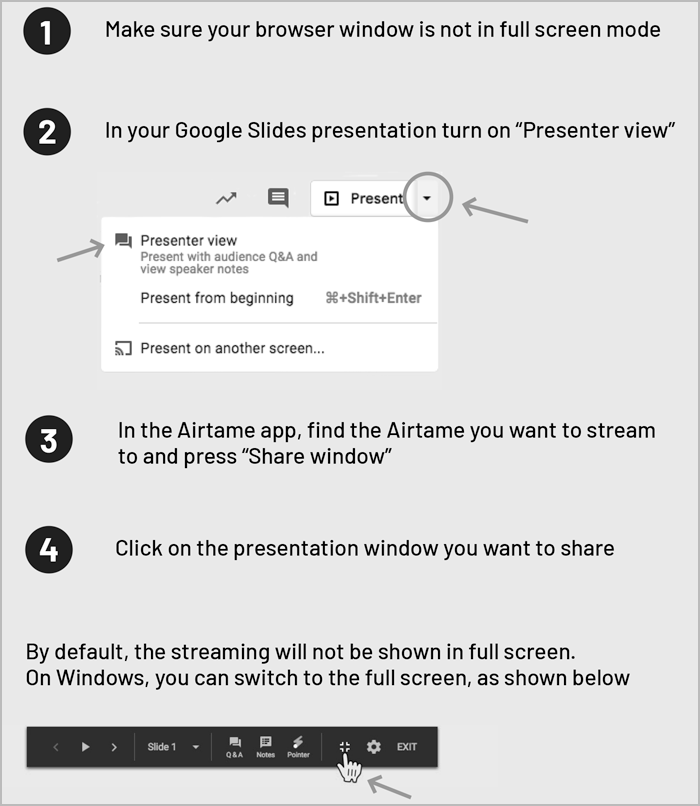
Using Presenter Mode in Google Slides
Instructions are provided in following poster image:

Text description of the previous poster image:
- Make sure your browser window is not in full screen mode
- In your Google Slides presentation turn on "Presenter view". (Select the Down Arrow icon and then "Presenter view").
- In the Airtame app, find the Airtame you want to stream
to and press "Share window" - Click on the presentation window you want to share. By default, the streaming will not be shown in full screen. On Windows, you can switch to the full screen. (Select the "full screen" icon).
Have Questions or Need Help?
For questions, concerns, and help visit Classroom Technology.